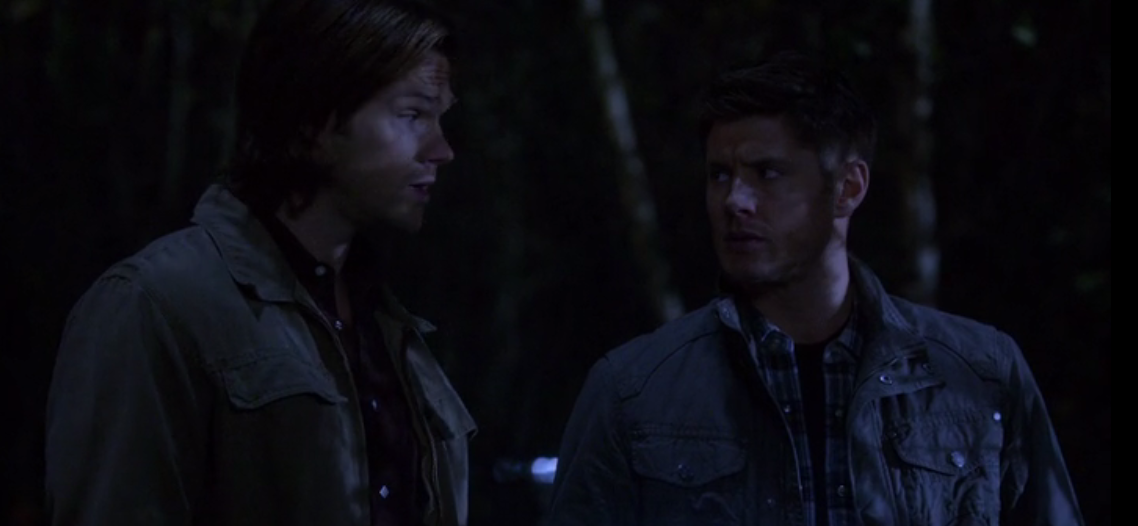
What the others are essentially saying is that you light the scene correctly exposed, and the darken the image in post. For example, in the photo of "Supernatural", their faces are probably lit at around 50% exposure, with the motivational light from the side (coming through the tress) is probably around 70-80% using HMIs. Then when you pop it in post, they can underexpose their skin tones to 30-40%, whilst having the motivated light at 50-60% exposure.
That's not what I'm saying at all! And that's unlikely as to how this scene was shot/exposed.
jax_rox, the example you used (and Gaffer Guy Holt quote)... I'm very new to this (much newer than the OP), so did they make the scene much darker in post then? Ie the scene was filmed with 'proper' lighting (exposed correctly - not under or over-exposed) and the scene was adjusted in post - say made 30%+ darker to the picture shown in your post?
Or did they light that scene as close to as shown in that photo? Which would probably be possible with a pro camera (Red?) and very expensive glass.
I'm assuming the former given 'Always, always, always light the scene.' but I may be interpreting your answer incorrectly...
I shot our indoor night scenes with little light and purposefully under-exposed them. The results looked good on my field monitor (Small HD AC7) at time of shooting but on my editing laptop's <$300 monitor the footage looks awful - far too dark. We're probably going to have to re-shoot those scenes.
When you have a camera system/format/stock you should
always test it, and take it through your post workflow to find out the latitude of the system/format/stock. This was very commonplace during the days of film, and you would shoot a short test roll of film starting at normal exposure, then gradually over-exposing one stop at a time and vice versa - after that underexposing one stop at a time. Once the footage had been processed, you would have a look at the results, and see the point at which you'd be happy to over- or under- expose a part of the image by a certain amount and still keep detail, and similarly, how much you'd need to under- or over- expose a part of the image for it to contain no detail at all.
With digital, you should definitely still do this. Find out the latitude of your format.
Then, once on set you can make informed decisions based on the latitude of your stock.
In the example of the Miller's Crossing shot, when Guy Holt says 'nothing in the shot is "correctly" exposed' what he means is that everything has been decided upon in accordance with the film stock and lens T stop to give it the exact look you see.
What I mean is, the DP goes in to the scene and decides that he wants to shoot the scene at let's say T2.8. Then, he carefully crafts the lighting to get the image you see in that shot.
For example:
'Correct exposure' would suggest that the talent's face should be exposed at T2.8. In this shot, this is not the case. There's a reverse key motivated from the lamp (though likely the light being cast on his face is coming from a light fixture rather than from the lamp) meaning the camera side of his face falls perhaps two-stops under (i.e. the light meter would say 1.4). The DP has done tests with this stock, so he knows that he will still hold the detail at two stops under.
The lamp itself is probably a stop over (i.e. the light meter would say 4.0) but the DP knows he will still hold the detail. His hands are perhaps around 'normal' exposure.
You could light this scene exactly the same whether you were at T2.8, T5.6 or T8.0. At T2.8 you might use a 500w light for the talent's reverse key, at T5.6 you might need a 2k to get the same effect.
This is why I always advocate lighting your scene and exposing accordingly, at least for digital. This shot looks more like it's shot about T5.6 as it's pretty deep focus. The DP could have opened up to T2.8 and let them darken it in post - but why would he? He's already getting what he wants out of the scene. It would take more time and money in post for them to darken the scene and he'd get the same image as if he'd just shot it at T5.6.
Of course, when working with film the DP would have rolled off a few seconds of a grey card and colour chart so that when it goes through the colour timing process, the timer knows where the exposure levels are meant to be. That, however, is different from essentially 'over' exposing to allow post to darken the image. When working with film, it's relatively commonplace to over-expose everything by 1/3-2/3 of a stop or more to create a denser negative, hold more detail and get finer grain. This is different again, and not something I'd recommend doing in digital. Film holds more details in the highlights, whereas digital tends to hold more detail in the shadows.
In the example of what seems to be a shot from Supernatural above, the light hitting them is probably a stop to a stop and a half under. The lens might be set to T2.8 and the light metering at T2.0.
Again, having said that - it's quite possible that the light was metering at T2.8 or even T4.0 and they've adjusted the crap out of it in post. I can't really see any reason for them to have done that, however. It's relatively easy to bring the HMI's squeezer down, put ND gel on the HMI or put an ND filter on the camera if you really wanted to expose at T2.8 but you were getting a bit too much out of the light.
Always know what you want, and don't make more work for post if you don't have to. Your Producer's will thank you when the bill comes in.
And in terms of your specific workflow, I'd suggest investing in a light meter
")
. I always use my meter, and I'll use my false colour in conjunction with my meter when shooting digital.