• Wondering which camera, gear, computer, or software to buy? Ask in our Gear Guide.

Lighting by Example!

I'd like to be able to learn from each other here. This thread will be for learning to get more complex lighting for the folk here. The format is:

1) Post a screenshot or viddy clip
2) Describe the lighting setup in detail
3) If you like, detail why you choose this particular setup

I'll start:
1)
24-frame.jpg

2)
I have a clamp light directly to the left of the two actors. You can see the rim of light on the face and some flare from it on the left side of the frame (the XL1s doesn't show you the whole frame in the viewfinder :( )

Three more to the right and higher to provide fill. All lights are clamped scoop lights from the hardware store with Phillips Marathon Soft White flourescent bulbs that fit in normal sockets.

3)
I thought this lighting setup would look neat ;)
 
posting

How do I post a frame of footage up? I see it done all the time. but have no clue how to do it... just give me the quick details and I will post them as I go along...
 
When posting, go advanced, then click on the paperclip above the text entry box...Once you have chosen the file and uploaded it, it will be added to the paperclip menu...selecing that will add it to the message.
 
I just bought the special edition release of "Dead Poet's Society" at target for $13.78...the BTS has a ligting master class that is one of the coolest things I've seen on lighting yet. I just wish it were longer. It shows not only straight up light here, light here kind of stuff, but using camera tricks as well and simple practical onset solutions to big problems.
 
Last edited:
Here is some lighting by example that shows the lighting as well...no explanation needed...I lied...the card is just a pice of foam core from the hobby store for reflecting light...lights used are craftsman 500w worklights...couple of variations are shown.

james lighting.JPEG

james lit zoomed.JPEG

james blue lite.JPEG

james dark zoom.JPEG

These were from our lighting tests before we shot "Average Joe"...to see if we had a prayer of putting it together or if we were just full of ourselves.
 
Last edited:
Got a request from someone via e-mail for how to on a shot from our trailer, thought I'd pass on my answer here:

Picture 2.jpg

knightly said:
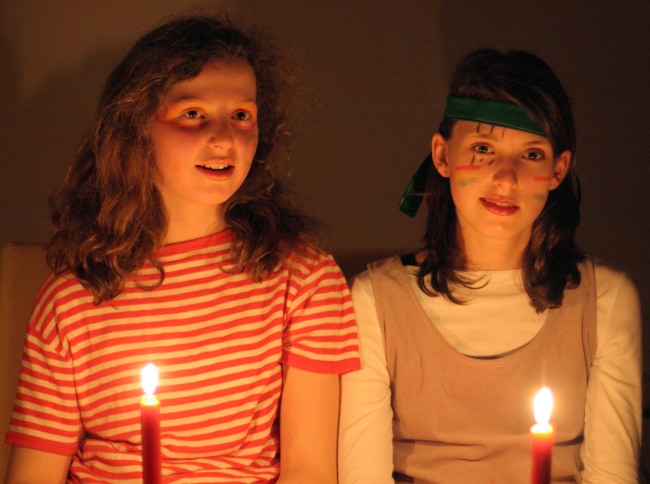
um...let me try to remember what we did. That is one of my proudest shots lighting wise in this production. I use compact flourescent self-ballasted screw in bulbs I like the GE softwhite bulbs, they filter out alot of the green tint from flourescents. I put these in ACDelco clamp lights (the ACDelcos won't fall apart on you when you use them for a little bit)...grand total, $15 / light.

3 of these clamped to a microphone boom stand on the right of the actors and about 5 feet above the floor. one light on the left for fill. incandescent table lamp behind him to the right for a little warm halo (white balance to the flourescents) and the bluish glint off the left cheek was either the moon or a street light out the window behind them...I just moved the lights closer to her when it came to do her singles so the light density matched on them. I left the blinds open behind them to let the black background fly (it was night-time). a bounce card could have been used to bring up the left side of the face for a less moody look, but it's a flashback, so I wanted it to be almost noir-esque.

Generally, you set the actors down and determine where the normal light would come from in a room and set your key light there...in this case, it was from the front of the couch...if it was to be a daylight shot, I would have keyed on the window side. Look into the camera and adjust your exposure to this.

Add fill light (lower level light to fill in the shadows) to the opposite side of the face (standard is 2 to 1 ratio of light...I just use my eyes) and lower (if the key is higher than the actors).

Then add light to the back from above if you can to create a halo around your subjects that acts as an outline against the background separating you subjects from what's behind them. If you end up having to fall to one side or the other with this, fall on the fill side as it will have the most trouble separating from the background (unless you light the background which we'll cover next).

if you have a bland background, you can either keep it dark and let the characters speak for themselves, or you can use light from severe angles to create some lines in the background (see toward the end of Casablanca when they come back to the bar and go upstairs to the office). You can shoot light through a cutout (window panes, venetian blinds, anything to add some texture). If you've spent the time to either dress the set or have a location that doesn't need it (much faster and cheaper), throw light across the background (shelf of books with titles hidden or out of focus, mixing console, cool curtains/draperies/tapestries, textured paint) at an extreme angle to show off the textures it creates...you may end up throwing light across it the other way to fill depending on your needs as well, just treat it like another subject in this case.

Leave enough room between your subjects and the backgrounds to provide room for lighting if necessary. by physically separating the subject and the background, it makes it easier to throw the background out of focus as well. If you get the camera closer to your subjects, the Depth of Field will decrease. right next to the camera lens, you can generally focus on you thumbprint and the back of your thumb will be out of focus...about 5 feet from the camera, you have about 2 feet of focus and that distance increases as you move away from the lens. Graph this with a tape measure for your camera so you know what your DoF options are. It may take a while, but the benefit is the control over your image that you get from the exercise. Remember that if you adjust the exposure it'll change your DoF...wide open (lower f-stop numbers like 1.4, 1.6, 1.8) will give you the shallowest DoF, while closed down (f-stop 18, 22) will give you longer DoF. You can use Neutral Density filters and polarizers to control the exposure at this point.

Run your camera in manual mode, don't trust it, it's a stupid machine. Make sure you run through a checklist every scene:

--Actors and Director--

This is all done on the set with the DP and crew taking notes...they will use this to set up the shot
Readthrough
Block (position your actors in the scene and figure out where they will need to go)

--DP and Crew--

I recommend fluorescent lights for the lack of heat
Use stand-ins/PA's while the director goes over the scene with the actors
Props
Lights
Framing
Adjust Focus
Adjust Polarizer (yes, even indoors I use them)
Check for glare from the lights
Check frame for extraneous contents (mic stands, exposed logos, people's feet)

--All Together Now--

Adjust Exposure
Check Focus
Check Sound Level
Recheck Focus
Quiet Please!
Rolling sound (if separate)
Announce shot for audio
Rolling Cameras
Slate
Background!
Action!
... (listen for sounds other than what the actors are supposed to be making)
Cut!
Lather
Rinse
Repeat

If you have more questions, you can tell I like to explain things...it helps me to understand them by forcing me to articulate each aspect of it, so I learn to. Lots of great info on http://www.indietalk.com on this and other aspects of indie production.
 
Oh man. There are a few things I wish this site had and this is one of them; except poor knightly is the only one doing it. This thread should be HUGE! Well the idea is a really good one, thanks knightly. :cool:

How to light a given scene. I must admit, I would rather throw my whole budget at a real lighting guy than do it myself. But since my budget is usually five bucks that doesn't work very well so my brother and I do it.

Here's one from me...

officer1a.jpg


This was particularly difficult because the room was really small (hot too just ask spinner) and we needed to make it look like an interrogation room.

We turned off the practical and hung a 150 Watt incandescent over the table. The biggest mistake was, that's all we used. :blush:

The nice thing is you learn by doing and so from this one, we learned that an eye light would have worked very well and if we had bounced some fill that would have been really good too. Separating the actor from the wall by having a frosted kicker back there to throw some light on the wall. The things you don't think about late in the shooting of a 48 hour film contest.

Since then I've learned about the little carrot under the nose and the twinkle in the actor's eye. I bought a book about how the pro's lit certain situations and I was shocked at how many lights these guys use for a shot. I'm in the process of trying to duplicate what I see and it's really nice to have a book that blue-prints the whole set up. We have another shoot coming up so I'll add something we did right after that's done. ;)
 
Lighting a Greenscreen

We are working with a greenscreen sized 5.2 x 3 m. The edges are seamed and have a lot of thread eyes to make attachment easier.

We use 2 heavy Manfrotto stands (max. height 4.1 m) and attach a pivot clamp on each one. Those are parts of 2 of the light boom kits Manfrotto offers. In addition we bought 2 extra boom sections to get the full length of 6 m. Because the sections haven't been made strong enough for that length you will have to support it in the middle by an autopole. That is basically a nice long stand which can be clamped between walls or floor and ceiling. With the help of superclamps you can hang your lights anywhere without having tripot stands in your frame.

Now we put a rope through all thread eyes and around the boom sections. The lower corners of the greenscreen should be stretched with ropes too so you get a nice crumple free background.

The greenscreen was lit by three Sachtler 1000 W halogen with diffusor. Two of them left / right at the ground and one on the top mounted on antoher autopole. I would also recommend the usage of green gel to increase the green purity.

The actor was lit by two Kobold daylight HMI 200 W, the key light from his left side 45 degree down and the fill from the right front, farther away. You have to be carefull not to compromise the greenscreen light.


Our crew preparing to shoot.
http://www.loom.at/wiki/images/4/49/Greenscreen_Crew.jpg


Me attaching the greenscreen. You can see the size of the greenscreen.
http://www.loom.at/wiki/images/5/5b/Greenscreen_Aufhaengung.jpg


Here you can see the whole setup I described earlier. Because we were missing one boom section, the frame was too short leading to some non-avoidable crumples.
http://www.loom.at/wiki/images/9/9d/Greenscreen_Aufbau.jpg


Closeup of the actor.
http://www.loom.at/wiki/images/4/4f/Greenscreen_Nahaufnahme.jpg


Acting in front of nothing isn't easy for an actor.
http://www.loom.at/wiki/images/9/9f/Greenscreen_Schrei.jpg
 
Last edited by a moderator:
You need several lights to get a good result. Three lit the greenscreen and two the actor.
http://www.loom.at/wiki/images/0/09/Greenscreen_Verzweiflung.jpg


After showing you some setups you might be interested in some before and after shots directly from the camera and final postpro.

http://www.loom.at/wiki/images/2/2b/Greenscreen_CU_raw.jpg


The image looks a bit blurry because of the extrem grading, blooming and virtual camera shakes with motion blur. But it looks very good in motion.
http://www.loom.at/wiki/images/c/c7/Greenscreen_CU_Final.jpg

Another setting:
http://www.loom.at/wiki/images/c/c3/Greenscreen_Boden_raw.jpg

http://www.loom.at/wiki/images/d/d5/Greenscreen_Boden_Final.jpg


You can downlaod some video diaries from our JENSEITS homepage. The videos are in German, but I think you can get the picture.

The result of the greenscreen work shown above can be viewed in the seventh diary (=Produktionstagebuch 7), available as XviD, WindowsMedia and Quicktime.
 
Last edited by a moderator:
Candle Light

candle light

This was done with one light. Important considerations are
- Level of ambiance (as the Mood setting element)
- Direction of the Key (horizontal and vertical angle)
- Quality of the Key (observe how does it occure in life)
- Intensity of the highlight on the face (if you look at life examples it hardly ever excedes Zone V)
- Color of the source (Amber gel)
 

Attachments

  • Candle005a.gif
    Candle005a.gif
    69.9 KB · Views: 164
Last edited:
@ jansik

In my opinion your candle light example has a certain lack of realistic impression of candle light. For me the nose shadow looks too strong and falls just not at the right angle. The light also seems too harsh because candle light should throw a soft kind of shadow (a flame is not a point light but a small aera light).
Look at this example, which is a true candle light only photo:

Kerzen.jpg
 
Last edited:
Candle Light

Thank you for your comment.
I suggest you take a candle and look at the reflection in the mirror in dark.
Observe the Light Quality and distribution of shadow. Observe the ambiance.
Try lighting from life rather than from the books.
And dont give up... you can still learn.
 
Thank you for your comment.
I suggest you take a candle and look at the reflection in the mirror in dark.
Observe the Light Quality and distribution of shadow. Observe the ambiance.
Try lighting from life rather than from the books.
And dont give up... you can still learn.

I really don't get the sense of your answer?
I suggest you take a look at the photo posted above, which is lit ONLY by candles. I did not make or light this scene, I just found the picture and put it up here as an example how REAL candle light looks like.
To my eyes your example just looks fake.

And thank you for you advice to not learn from books and not give up .... :D
You might be interested to know that I did work as the lighting camera man for a full feature film which has been played for several weeks in cinemas in Austria. So I already might have a little bit of knowledge how to light ;)
In fact I have already successfully lit a couple of candle light scenes. And I always learn by using a combination of theory (books), practice (observing and reproducing) and common sense. There is and always will be more to learn, but that is the interesting part of life.
 
according to the specular highlights in the left girls' eye, I think there might be a third light in the shot...and the shadow on the left is below the girls' heads.

Depending on the subject of the piece you're shooting, both lighting setups are valid. The first is more of a classic noir/horror look with the shadows drifting quickly to black. The second is more of a glamour lighting setup with (at least) 2 sources providing Key (the handle held by the girl) and fill (the candle held by the other girl).

The proximity of the light sources in the 2 shot gives a much softer light whereas the larger artificial light being farther away would give a harder edge to the light and over power the practical flame's luminance (easier to expose the flame within tolerance in this setup as well).

Again, both are equally valid lighting setups depending on the mood you're going for.
 
Back
Top